The following article is Part Two of a report from our April and June 2020 issues, covering the 2020 Gold Coast final. The event was won by a team including Alex Antonios, a new bridge player attending his first major event (pictured left with teammates Matt Brown, Michael Whibley and Nabil Edgtton on our April 2020 cover). Alex, known professionally as AJ, recently appeared with Nabil on John McAllister's podcast,
The Setting Trick, discussing how AJ came to be playing in the event.
In the previous issue we covered this year's Gold Coast Open Teams up until the end of the semi-finals. The seemingly unstoppable ASHTON team had finally been stopped by WARE, while CORNELL had dispatched South Africans APTEKER.
We conclude with the final match between WARE and CORNELL.
In what would be the last major event played in Australia for several months due to the coronavirus pandemic, the final of the Gold Coast Open Teams would be contested over four sets of 12 boards on a sunny 'leap day' at the end of February. For their efforts in the qualifying rounds, CORNELL would start with a 0.1 imp tiebreak in their favour.
For CORNELL, Michael Whibley - Matthew Brown play all the boards and employ a hyper-aggressive form of 2/1 with transfer responses to 1

and filthy preempts in most situations. For the rest of their five-man squad, Nabil Edgtton partners either Alex Antonios or Ashley Bach, with both lineups playing a fairly simple 2/1 structure.
For WARE, Michael Ware - Nick Jacob use a Kiwi-themed weak notrump system as well as a 'comic notrump' overcall showing either a weak preemptive hand or a natural 1NT bid. GeO Tislevoll - Terje Lie play a Scandinavian-style 2/1, while Max Henbest - David Wiltshire play a more local-flavoured version of 2/1; both of the latter pairs use transfers over their 1
opening.
On the first board of the match, Brown - Whibley looked like they were on their way to the seven level until Wiltshire doubled 5
![]](images/heartsm.gif)
, asking for a heart lead and sowing some confusion in the ranks:
| West | North | East | South |
|---|
| 1 | pass | 1
| | pass | 2 1 | pass | 2NT 2
| | pass | 3 3 | pass | 3
| | pass | 3NT 4 | pass | 4NT
| | pass | 5 5 | pass | 5
| | dbl | pass | pass | 6
| | all pass | | |
| 1. Four-card support 11-14.
2. Inquiry.
3. Natural.
4. "Non-serious", a minimum hand for slam.
5. 0 or 3 keycards.
6. Asking for the SQ.
|
|
|
When Whibley passed, Brown assumed that either the trump queen was missing or there were too many gaps to risk a grand slam. After Henbest's
10 lead, Brown drew trumps, cashed his other top heart honour then took the ruffing finesse through Wiltshire to establish the heart suit: NS +1010.
| West | North | East | South |
|---|
| 1 | pass | 1 1
| | pass | 1 2 | pass | 2 3
| | pass | 2 4 | pass | 4NT
| | pass | 5 5 | pass | 5 6
| | pass | 5NT 7 | pass | 7
| | all pass | | |
| 1. Spades
2. Either three spades, or four and a minimum.
3. Artificial game force.
4. Four-card support and minimum.
5. 0 or 3 keycards.
6. Asking for SQ.
7. SQ and two kings.
|
|
|
In the closed room, the Norwegians made short work of this fair grand slam. After confirming that a nine-card fit existed, Lie checked on keycards before blasting to the seven level. 7
is not completely cold, but Antonios'
A lead simplified things immensely; +1510 and 11 imps to WARE to open the scoring.
Henbest chose to open the East cards with a weak 2
, producing shudders from the audience but fully consistent within the partnership style. Wiltshire raised to 3
and Whibley doubled for takeout from the North seat, happily left in by Brown. After the
3 lead, Whibley cashed the top two clubs which established a discard for one of declarer's losers; when the smoke settled, declarer was three down for NS +500.
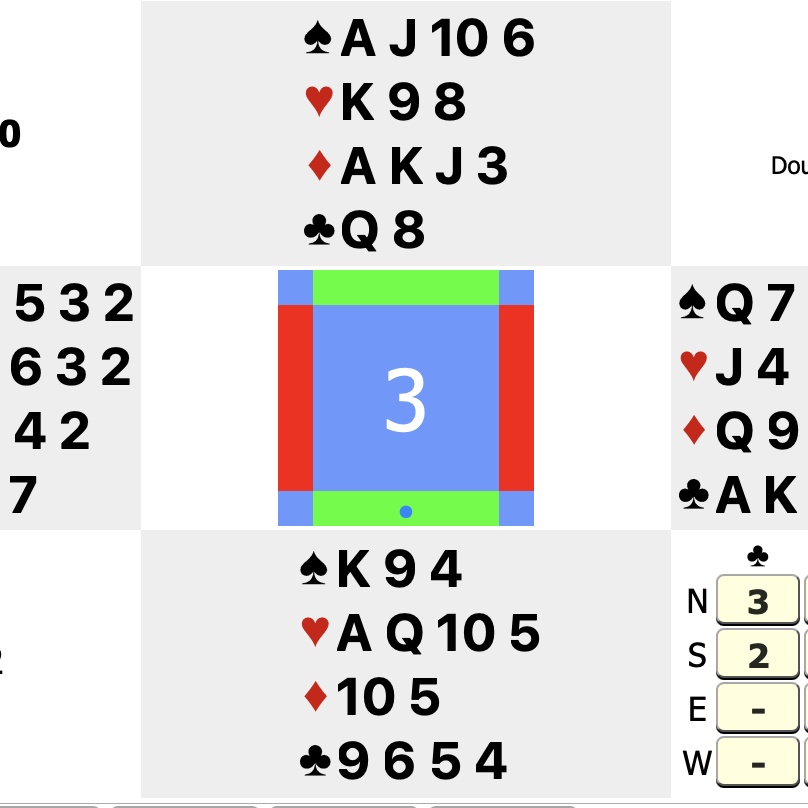
At the other table, Tislevoll declared 3NT from North after an artificial overcall:
| West | North | East | South |
|---|
| | pass | pass
| | 1 | 2NT 1 | 3 | 3NT
| | all pass | | |
| 1. "Unusual", showing 5+H/5+C.
|
|
|
Which diamond would you lead from the East seat? Seeking to emphasise his extra length, Antonios chose to lead the more encouraging fourth-highest
4 rather than a higher spot card. After dummy's queen was taken by Edgtton's ace (a strong deceptive play), the defence returned a heart to Antonios for the
2 back through dummy. To give himself a chance, Tislevoll had to insert the
7 either on the first trick or now, but when he played the jack Edgtton could win the king he had so carefully concealed and return a diamond to establish the suit.
Declarer's last chance to make his game was to run the
J (pinning the 10-9) but he had no reason to play for that and tried to drop the doubleton queen. When this didn't work, Tislevoll attempted to limit the damage to two down by finessing on the third round of spades; this lost as well and the superb defence had the rest for four vulnerable undertricks and NS -400. CORNELL had 14 imps back.
A couple of quieter boards followed, WARE picking up 2 imps for staying a level lower on a hand with bad breaks afoot before both teams stretched to a poor 22-point vulnerable game, both declarers duly failing for a flat board. Then came this high-level decision:
| West | North | East | South |
|---|
| 1 | 1 | 2
| | 4 | 5 | pass | 6
| | all pass | | |
|
|
Wiltshire chose not to unilaterally sacrifice after Brown guessed to punt slam. After the
K lead, 6
looked doomed from a single-dummy perspective, but Brown brought it home. After winning the lead and crossing to dummy in trumps, he ruffed a small diamond, cashed two more rounds of trumps ending in the dummy, then played the diamond ace hoping for a doubleton king. That wasn't to be, but declarer was still cold when he led the heart off the dummy as East had no spade to return. Declarer could pitch dummy's spade on the
K and eventually ruff two losers in the dummy and rely on the ruffing diamond finesse to produce the twelfth trick: NS +1370.
At the other table, Edgtton was convinced by the opponents' bidding into taking a solo dive.
| West | North | East | South |
|---|
| 1 | 1 | dbl
| | 4 | pass | pass | dbl
| | pass | 5 | pass | 6
| | 6 | dbl | all pass |
|
|
On the
A lead, the double dummy line to escape for two down in 6
doubled is to discard a diamond at trick one! Declarer can ruff the next club and take a heart finesse, but the defence has no good options and declarer can eventually establish the spades with some guesswork.
At the table, Antonios decided to ruff the opening lead and take the heart finesse. When the defence continued with a second club, he realised the danger of losing touch with the dummy and opted to pitch a diamond, but when Tislevoll won the
K the roof fell in. After switching to the ace of diamonds, Tislevoll continued with the queen to ruff out declarer's king. The defence was still due another trick and ended up with +800, but that was nevertheless 11 imps to CORNELL after Brown's efforts in the other room.
WARE struck back with modest gains on the next three boards. Whibley - Brown did well to bid a slam, but this was eclipsed by -1100 at the other table when Antonios's seven-card vulnerable weak two was doubled for four down. A sloppy defence costing an undertrick was followed by an Edgtton - Antonios adventure to a 23-point game which was odds against and quickly failed.
Trailing 23-27, WARE won a fortunate swing on the next deal due to systemic differences. Wiltshire was able to make a transfer response to his partner's 1
opening and let Henbest declare the hand in 4
, while Edgtton was forced to respond naturally and ended up wrong-siding the same contract. Henbest was never under pressure while Edgtton in the other room had to deal with a challenging lead and finished one down; 12 imps to WARE.
The last three boards of the first set had some exciting moments but only resulted in one more imp being turned over. Antonios and Henbest both replicated a strong technical line in 3NT, while on the next board both Whibley and Tislevoll chose to overcall 1NT opposite a passed hand facing a 1
opening on their right with these cards:
Whibley later came close to putting down the dummy in 2
with a 3-2 fit, but he and his partner were rescued by a double and ended up defending a normal contract for a flat board.
WARE picked up an imp on the last board when Wiltshire made one more trick than Edgtton in 3NT, so WARE had the early lead 36-27. That would be the last we saw of Alex Antonios for the match as he made way for Ashley Bach to partner Edgtton for the remainder of the boards, but Antonios had played a remarkably solid set under immense pressure, given his lack of experience.
In the closed room, Edgtton-Bach had a normal auction to declare 3NT from the West seat. Tislevoll cashed a top club and Lie was forced to discourage, otherwise risking an underlead on the next round. Tislevoll switched to spades but declarer only had eight top tricks, and when Edgtton didn't cash all of those tricks before playing on diamonds he was two down for NS +200.
| West | North | East | South |
|---|
| pass | 1NT | pass
| | 2 | dbl | 2 | pass
| | 3 1 | pass | 3 | pass
| | 4 | all pass | |
| 1. Asking for a club stopper.
|
|
|
The weak notrump opening changed the complexion of the hand, not for the last time this match. When Whibley was able to double 2
for the lead, East-West knew there was an issue in the club suit and attempted game in their 4-3 spade fit. After cashing two rounds of clubs, switching to any suit allows declarer the chance to make via the double-dummy play of drawing just two rounds of trumps followed by establishing the diamond suit; dummy's remaining trump guards against the club tap.
In any case, Whibley did not switch. He played a third round of clubs for a ruff and discard and Jacob was in trouble. He attempted to sneak a diamond to the king (if that held, he was home with trumps behaving) but Brown won and found the only card to deliver the knockout blow: a fourth round of clubs. Whichever hand Jacob ruffed in would promote a trump trick. Sparkling defence from the two New Zealanders and NS +100.
Jacob's weak notrump drew blood on the next board when Brown failed to double 1NT for penalties and Whibley - Brown found themselves in the unfamiliar scenario of playing a partscore with 26 points. This lost 6 imps when Lie was able to overcall 1NT at the other table with Brown's hand and quickly reach game. But it would not take long for CORNELL to win back a big swing.
It's rare that you are dealt zero points but you decide the outcome of the hand. What would you lead against 6NT with this hand?
Your opponents, through an inverted minor auction agreeing clubs, describe their hands as 11-14 balanced and a spade control on your right, while dummy's bidding sounds very strong and balanced. What's your choice?
Here's the full deal:
Did you choose the dangerous-looking diamond? If so, four down is your reward. Any other lead gives declarer all the tricks. Tislevoll chose the spade nine and that was NS -1020. It's hard not to have sympathy for his lead, but it would prove to swing a huge number of imps.
At the other table, this was the auction:
| West | North | East | South |
|---|
| | | pass
| | 1NT | pass | 2 1 | pass
| | 2NT 2 | pass | 3 3 | dbl
| | pass | pass | rdbl | pass
| | 3 | pass | 4 | pass
| | 5 | all pass | | |
| 1. Transfer to clubs or invite to 3NT.
2. Minimum.
3. GF with clubs, either diamond shortage or balanced.
|
|
|
For the third board in a row, the weak notrump had a substantial effect on the auction. When Jacob's 3
bid was doubled, the danger of West playing the contract was made clear in a similar way to the first board of the set. After Jacob redoubled, Ware bid 3
and Jacob raised to 4
as an offer to play. When Ware backed into clubs, the only remaining chance to flatten the board was for Jacob to bid 6
, but naturally he passed. Jacob missed a big opportunity to right-side clubs by bidding 4
over 3
; had he taken that risk, East-West would have had a chance to flatten the slam in style by playing the cold 6
from the East seat. As it was, NS -400 was worth 12 imps to CORNELL.
| West | North | East | South |
|---|
| 1 | 1 | 1 | 1
| | 2 | all pass | | |
|
|
A normal auction to a poor spot. After Whibley's fruity
6 lead, Brown switched to his singleton diamond and declarer eventually ran into a trump promotion for down three. NS +300.
| West | North | East | South |
|---|
| 1 | 1NT | 2 | dbl
| | pass | pass | 2 | pass
| | pass | dbl | all pass |
| |
|
A less normal auction to a much worse spot. GeO Tislevoll has been around for many years but still manages to play an active 'youthful' style of bridge that puts pressure on his opponents and creates opportunities. After his aggressive 1NT overcall, Bach's actions look completely normal but Bach found himself declaring 2
doubled with a 5-1 break against him. The only lead from South to extract the maximum was the singleton trump, and Lie found it. Tislevoll played trumps every time he got in and Bach made just three trumps and one heart for NS +1100. This body punch swung 13 imps back to WARE. Note that if South leads the
A, declarer plays a second round of spades early and North loses touch with South's long suit winners after trumps are drawn; declarer has lots of options at this point and winds up only two down.
CORNELL won back 4 imps after a 'comic notrump' by Ware was punished for 300, before this difference in opinions on opening bid:
What would you choose to open at favourable vulnerability in third seat after two passes to you? Edgtton opened 4
, was doubled and played there, making easily when partner turned up with a very suitable dummy. At the other table, Ware opened 1
which gave the opponents plenty of room to find their spade fit, eventually selling out to 4
. That was the right decision when 4
failed by a trick but was still worth 10 imps to CORNELL.
Three flat boards followed: both EW bid to a normal but poor vulnerable game and failed by two tricks, before also flattening a sub-50% grand slam that was optimistically bid and made in both rooms. A normal game was another push before Edgtton - Bach had a strange-looking auction to reach the five-level off three top tricks while looking for slam. Lie found the winning lead, so that was a painless 12 imps back to WARE. An overtrick imp to WARE followed, before this final board of the set:
Bach opened 2NT in third position and declared 3NT after a Stayman auction. Lie led a spade and was eventually triple squeezed, the defence just scoring one club for NS -490.
At the other table, there was considerably more action:
| West | North | East | South |
|---|
| pass | pass | 2NT | 3
| | 3 | 3 | dbl | pass
| | 3 | pass | 3NT | all pass
| |
|
Both Brown and Whibley amped up the aggression in typical fashion here, particularly Whibley's free bid of 3
after Ware had taken North-South off the hook. For some reason Ware was not interested in playing for a penalty. Had Jacob been allowed to defend 3
doubled and lead out four rounds of trumps, best defence would hold declarer to just two tricks for -1700. There may have been some doubt in Ware's mind about whether his partner was doubling for takeout or penalties; whatever the reason, he eventually removed the opponents from the bloodbath in 3
doubled and played in the normal game. I will leave you with one of the vugraph comments: "If there is a way to destroy the vugraph records of this hand, it would probably be a good idea."
Jacob made eleven tricks in 3NT, so that was 1 imp to CORNELL instead of 15 the other way. Nevertheless, WARE had won 8 imps on the set and extended their lead to 17 imps with the halftime scoreboard 71-54.
Set 3: Boards 25-36
CORNELL opened the scoring on the first board of the set when Whibley pre-empted a level higher than Wiltshire. Both held this hand, dealer at nil vulnerable:
Wiltshire opened 2
, 7-10 with a six-card suit. With a lot of shape and a big spade fit, his opponents got to 4
easily and never looked for slam: NS -450. At the other table, Whibley opened 3
and was raised to 4
by Brown. This succeeded in pushing Ware - Jacob into investigating slam and both took aggressive actions under pressure to reach a very poor 6
; 11 imps to CORNELL.
Revenge came quickly. On the next board, Jacob and Bach picked up this hand, dealer at favourable:
Bach opened a weak 2
and was raised to 3
. After Wiltshire - Henbest investigated fits in the majors, they settled in 4
going one down. At the other table, Jacob opened 3
and his opponents had the same competitive auction except a level higher. Ware found a well-judged tight double of 5
and was rewarded with +500 and 9 imps back to his side.
6 imps went to CORNELL on the next board when Wiltshire bid 5
over 4
with a strong balanced hand while Whibley opted to pass and defend: 5
went one down while 4
went two down. 14 more imps followed when Brown, with
insisted on playing in 4
opposite an opening bid with both minors, making easily, while Henbest allowed his partner to declare 3NT after bidding his spades three times. 3NT had chances to make but when Wiltshire tried a finesse in the endgame to make his contract, it failed and he wound up down three vulnerable.
Now trailing by 5 imps, Wiltshire and Henbest bid very well on the next hand:
| West | North | East | South |
|---|
| 1 | pass | 2 1
| | pass | 3 2 | pass | 4
| | all pass | | |
| 1. Game-forcing with clubs or a balanced hand.
2. 5+S/5+D, minimum strength.
|
|
|
Whibley - Brown had a simple auction to the inferior game contract of 4
. On a heart lead, Whibley needed to play double-dummy to make his contract, but eventually lost two trumps and two diamonds for NS -100. At the other table, Wiltshire was able to show his short clubs, logically suggesting a diamond suit given his failure to bid hearts:
| West | North | East | South |
|---|
| 1 | pass | 2 1
| | pass | 2 2 | pass | 2
| | pass | 3 3 | pass | 3NT
| | all pass | | |
| 1. Three-way, either invitational raise of spades, GF balanced or GF clubs.
2. Accepting opposite invite, not four hearts.
3. Shortage.
|
|
|
When Henbest offered 3NT, Wiltshire was happy to pass having given a good description of his hand. He was hopeful diamonds would provide a good source of tricks in 3NT and that the weak spades might cause issues if they were trumps.
Henbest received a heart lead and opted to win on the dummy and take the club finesse. Edgtton continued with a second heart, and Henbest cashed two clubs before hooking diamonds around to the queen. With the South hand now stranded, if Bach returned a heart Henbest would be forced to play for the defender with the ace of diamonds to have short hearts which would succeed. Instead, Bach switched to spades. Henbest took the king with dummy's ace, played a diamond from dummy (holding the trick), then led a spade towards his hand to establish his ninth winner. That was worth NS +600 and 12 imps to WARE, now back in the lead.
A rare flat board in a partscore followed before WARE extended their lead when Jacob drove his side to slam missing an ace plus the queen of trumps in a nine-card fit. He played Brown for the trump queen after seeing him lead out his ace and duly racked up 1430, while Edgtton-Bach never looked at slam. That was 13 more to WARE.
A common theme of this match was how high to preempt with shapely hands. This was yet another hand where opinions differed. Edgtton opened 3
and was raised to 4
after Wiltshire's takeout double. Both North and South must have considered acting further, but they eventually passed the contract out. Edgtton played 4
nicely after a spade lead: he won in dummy, trumped a spade and led a club towards the king. After Wiltshire won his ace, the only card to defeat the contract was the
K which would allow the defence to draw two rounds of trumps; a very difficult play to find. After Wiltshire's club return was ruffed by Henbest, declarer was in control and he was able to establish the club suit, losing two trumps and a club.
At the other table Ware made up for his lack of preempting in the previous set by opening with a pushy 4
. After Whibley doubled and Brown bid 4
, Jacob decided to compete to 5
; perhaps a good decision, as 4
by South is likely to come home, but given the result at the other table merely reducing the damage. 5
was doubled and Whibley led spades. Ware won on the dummy and instead of working on his side suit, he tried a heart to the nine and king. Brown was later able to ruff a club and play a second round of trumps which reduced dummy's ruffing power, so Ware finished down two for NS +300 and 12 imps back to CORNELL.
On the next board, both East-Wests missed an excellent 31-point slam which was difficult to find given the presence of some key minor honours in the weaker hand of the partnership. Less forgivable was each East-West's failure to bid a 27-point game on the deal after; Edgtton-Bach had a system mix-up, while Ware took a very conservative view at the other table and played in 2
making eleven tricks.
Polish world champion Jacek Kalita has said about top matches, "I don't think that high-level bridge is super scientific. Especially the late knockout stages resemble a heavyweight fight where the most important skill is to stay alive." Each side is unwilling to pack up shop too soon, but any poorly timed lunge or glancing blow can be punished by the other side.
Holding this hand, would you keep the auction open or let it go?
Ware and Edgtton each heard a weak 2
opening on their right, doubled and raised to 3
. After two passes, Ware passed out the hand and defended; Edgtton opted to double again.
At Ware's table, double-dummy defence could have defeated 3
but making 9 tricks was a normal result; NS +140. After Edgtton's second double, Bach bid 4
and was doubled there by Wiltshire. Wiltshire followed up his ballsy double with excellent defence and soon collected +500 for his efforts to win 8 imps for WARE.
On the last board of the stanza, Brown - Whibley appeared to have a system misunderstanding and overreached to 3NT with inadequate values while Henbest-Wiltshire stopped in a partscore in the other room for 7 more imps in the plus column. Winning the volatile set by 7 imps, WARE led 121-97.
Set 4: Boards 37-48
Having picked up imps in every set so far, Tislevoll-Lie saw no reason to change a winning formula and opted to sit out the deciding stanza. Likewise, Antonios remained on the bench for CORNELL, so it would be the same line-ups for each team sitting in the same seats for the last twelve boards.
The action started on the first board:
| West | North | East | South |
|---|
| 1 | 1NT 1 | 3
| | dbl | pass | 3 | pass
| | pass | 4 | pass | 4
| | pass | 5 | pass | 5
| | all pass | | |
| 1. "Comic notrump": either natural 15-18 or a weak one- or two-suited hand.
|
|
|
A wild swing by Jacob landed flush, sowing enough confusion that NS missed their cold slam. With such a strong hand, Ware was confident that his partner held the weak variety and chose to pass 3
, leaving Whibley to start his slam try at the four level. Both Whibley and Brown had a little in reserve for their bidding but neither were confident enough to risk bidding slam: NS +620.
| West | North | East | South |
|---|
| 1 | pass | 1
| | pass | 2 1 | pass | 4
| | pass | 4NT | pass | 5
| | pass | 6 | all pass |
| 1. Game-forcing jump shift.
|
|
|
Edgtton opted not to overcall 1NT in fourth seat; if he had, the auction would have been much more difficult. With the bidding to themselves, Wiltshire - Henbest made it look easy. The key bid was Henbest's splinter; the double fit and club void convinced him to show his shape despite his weak values. After partner's splinter, Wiltshire would have been thinking of grand slam but had to be content with just six after finding out that a keycard was missing. Twelve tricks were easy; +1430 and 13 imps to WARE, now leading by 37 imps.
CORNELL started to claw back the difference immediately. First, they won 4 imps when an aggressive takeout double from Whibley pushed his opponents a level higher in a partscore, failing by a trick, then another imp when Edgtton found a nice technical line to bring home 5
when Ware was only in 4
in the other room, just making.
The fourth board of the set was an exciting partscore deal which CORNELL managed to declare in both rooms. The play was interesting at each table and both defending pairs had opportunities to take their opponents down, but both declarers ended up making for 6 more imps to CORNELL.
The same team would win their first double-digit swing of the set when Bach and Jacob each held:
Jacob's auction started 1
on his right which he chose to double for takeout. After an artificial 1
response on his left denying a major suit, Ware doubled and Jacob passed. When Brown on his left retreated to 1NT, Ware doubled again and Jacob passed again. 1NTx would have been down one on some leads but made on the normal lead for NS 180.
Bach's auction began:
| West | North | East | South |
|---|
| 1 | pass | 1NT
| | dbl | pass | ? |
|
|
He chose to bid 2
rather than pass, and after a mix-up in the subsequent competition where his opponents chose to play in the wrong minor suit, Bach was able to double 3
for penalties. Despite dropping a trick in the endgame, Bach still collected +500 and 12 imps for CORNELL, reducing the deficit to just 14 imps.
| West | North | East | South |
|---|
| | 2 | pass
| | pass | 2NT | pass | 3NT
| | all pass | | |
|
|
| West | North | East | South |
|---|
| | pass | 1
| | 1 | 2 | 2 | pass
| | pass | 3NT | all pass |
|
|
Halfway through the set, both Norths chose to bid notrumps without a spade stopper, and neither received a spade lead with both Easts trusting the sound of the bidding. On a diamond lead, Wiltshire simply won and played club king, club ace, club queen and claimed nine tricks when the suit broke 3-3 for NS +600.
At the other table, Jacob led a heart to the 10, queen and king. When Whibley cashed two rounds of diamonds, Jacob pitched a spade, so it was now safe for declarer to lead a spade and hope for one of several good things to happen. On Whibley's spade lead, Jacob put in the
9 which held the trick, and the defence continued with a second spade to Ware's ace. Ware returned the
9, covered by Jacob's
J, and Whibley was forced to win the trick in the dummy leaving this ending:
Whibley knew that East's shape was either 5-3-1-4 or 5-4-1-3. When he cashed dummy's diamond queen, Jacob threw the spade queen and we had reached the moment of truth. Eventually, Whibley decided that Jacob would not have opened 2
with four hearts on the side, and played a heart; that was NS -100 and 12 crucial imps to WARE in one of the most intriguing cardplay hands of the match.
On the next board, Whibley speculated with a penalty double of a game which was in reality cold for at least one overtrick. Ware just made his game, but that was another 4 imps in the bank. This left WARE 30 imps in front with five to go, and after two flat boards followed it seemed like the match was over.
But it wasn't over yet.
These were the final three boards:
| West | North | East | South |
|---|
| | 1 | pass
| | 2 | 2 | 2 | 3
| | 4 | pass | 6 | pass
| | 6 | all pass | |
|
|
Ware - Jacob were playing Acol in an occasional partnership, and Jacob was under the impression that 2
was non-forcing and hence limited his strength. Opposite a 4
slam try, Jacob was happy to reveal his club support and try for a slam believing that he had extras in context. Ware, on the other hand, believed that 2
was simply showing the sixth spade and made no statement about strength; under those assumptions he was too strong to just bid game. 6
had no real play and finished down two: NS +200.
| West | North | East | South |
|---|
| | 1 | pass
| | 2 | 2 | 2 | 3
| | 3 | pass | 4 | pass
| | 4 | all pass | |
|
|
Playing two-over-one game forcing, 2
contained no information about strength. After Edgtton's raise to 3
, Bach's 4
cuebid was a non-serious cue bid by agreement, cooperating with the slam try but showing minimum strength. Edgtton considered the range of various hands that partner could have and eventually decided slam was doubtful; signing off in 4
saved the board. Well done. Bach made 11 tricks in 4
for NS -650 and 13 imps to CORNELL. The margin was back to 17 imps with two boards to play, doable in theory but still unlikely in practice.
| West | North | East | South |
|---|
| | | pass
| | 1 | dbl | 3 1 | pass
| | 3 | dbl | pass | 4
| | all pass | | |
| 1. Bergen raise, 6-9 with four spades.
|
|
|
Ware's decision to bid a mere 3
is right on points, but these ten-card fits do make a lot of tricks, especially when there is shape about. This hand is a prime example: NS and EW both make the same number of tricks in their major suit fit despite NS having 24 points and EW having only 16. Ware could have saved the day on the next round by bidding 4
as a two-way shot over 4
, but he took his chances on defence and they turned out to be poor. EW could only take three diamond tricks; NS 620.
| West | North | East | South |
|---|
| | | pass
| | 1 | dbl | 3 1 | pass
| | 4 | all pass | | |
| 1. Bergen raise, 6-9 with four spades.
|
|
|
Edgtton had no doubt about jumping to 4
after discovering the ten-card fit. Opposite the right hand 4
could very well make, and meanwhile the opponents were still in the auction and might have something on their way. This time both of those things were true. Wiltshire opted to pass, worried that if he doubled for takeout a second time his partner would bid a failing five-level contract while 4
seemed likely to go down with his hand, but 4
posed no difficulties in the play: NS -620 and that was a double game swing for 15 imps to CORNELL.
All of a sudden, the margin was a mere 2 imps to WARE with one board left.
| West | North | East | South |
|---|
| pass | 1 | 1 | dbl
| | 3 1 | 5 | pass | 5 2
| | pass | 6 | all pass |
| 1. Good four-card spade raise.
2. Intended as RKCB}; real meaning unclear.
|
|
|
This looked like a flattish slam board. With North having fantastic shape and South having a club fit and sound values, it was hard to imagine either pair missing 6
. Facing spirited competition, Brown tested the grand slam waters with a 5
try, but Whibley had done enough and signed off in 6
: NS +920. Whibley later told me that even if 5
was keycard in clubs as he suspected, responding 6
would be safe as this would theoretically show two keycards without the queen; Brown would be unlikely to risk a grand slam off the queen of trumps.
The open room finished the set first, so all eyes were on the other table with WARE needing to flatten the slam to clinch the title.
| West | North | East | South |
|---|
| pass | 1 | pass | 1
| | pass | 2 | pass | 2 1
| | pass | 3 | pass | 4
| | pass | 4 | pass | 4
| | pass | 4 | pass | 4NT
| | pass | 5 | pass | 5
| | pass | 5 | pass | 6
| | pass | 7 | pass | pass
| | dbl | all pass | | |
| |
|
Wiltshire - Henbest had the auction to themselves with Bach seeing no reason to overcall on the East cards. Up to 4
, the auction seemed normal: NS used fourth suit forcing then presumably agreed the trump suit. After a series of cuebids, Henbest used keycard and discovered partner had one plus the queen of trumps. His 6
was an attempt to play there, but in a dramatic turn of events, Wiltshire bid on to grand slam.
Why did Wiltshire bid 7
? Assuming clubs were trumps, 5
was asking for the queen, but this bid also committed the partnership to at least 6
; hence, grand slam must also be in the picture with 5
guaranteeing all the keycards. With running diamonds, Wiltshire's hand was good enough to have a go at 13 tricks. Henbest, on the other hand, was apparently interested in 6NT as a contract and believed they had an agreement that this auction did not guarantee all the keycards.
Whatever the reason, North-South were not on the same page and reached a doomed contract. The match wasn't over yet, though. 7
was far from no play with East on lead; in fact, it was cold on any lead but a heart.
Edgtton was still awake and happy to double 7
, Lightner, asking for an unusual lead of dummy's first bid suit. Time stood still as Bach considered his options. Eventually he led… the
3. The failing grand slam was worth 14 imps to CORNELL, their third double digit swing in as many boards and a 'comfortable' 162.1-150 win of the 2020 Gold Coast Open Teams.
For those watching, this was the moment when shock set in. Three boards ago, the match had been over and WARE had won. But CORNELL had somehow managed to pull the match back at the last possible moment. "It's not over until it's over" had never been truer.
The WARE team were truly unlucky to have things go their way for much of the day only to have the roof cave in at the very end in a cruel twist of fate. To CORNELL, we can only raise our glasses and congratulate them on a feat of perseverance and patience. After the match, Nabil Edgtton said, "This match was just a lesson in focus. For me, the entire finals were a war of attrition. Nothing was really ever going well at my table and it was actually pretty tough at times to keep sitting there grinding and not doing anything wild or swingy. But sometimes your teammates have you covered."